Professional sump pump repair can cost a bit more than DIY work, but the price is worth it for accurate diagnosis and skillful repairs. They’ll also be able to ensure that your warranty stays valid.
A clogged or broken sump pump will lead to flooding and expensive repair bills. If you spot these problems, it’s important to have them repaired immediately. Contact Plumber St. Petersburg FL for professional help.
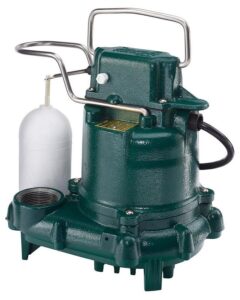
The float switch within your sump pump helps to keep it running at the correct water level. It does this by moving up and down with the amount of water in the pit, activating when it reaches your pumps designated pumping point, then shutting off when it falls below. When your float switch fails, the pump will not activate when it needs to, and this can lead to flooding and other problems.
There are a few different reasons that your float switch might fail, the most common being that it gets stuck. This can be caused by debris in the basin, or it may be because the float itself is blocked. It is important to regularly open the sump pit lid and sweep it out to prevent this from happening.
Another reason that your float switch might fail is that it is not working properly. This can be because the float arm is not rising and falling with the amount of liquid in the pit, or because the pump is not activating correctly. It is important to test this by pouring water into the pit, then watching the float arm to see whether it rises and falls as it should. If it does not, it is likely that the switch is faulty and it will need to be replaced.
Float switches can be purchased in many different sizes, styles, and voltages, so it is important to choose one that is compatible with your pump. Look for a piggyback style float switch that will plug into the back connector of your pump. This will ensure that the new switch is not shorting out the electrical circuit, which can be a serious safety issue. Also, make sure that the new switch has a cord that is long enough so that you can easily reach it to turn the pump on and off when needed.
Once you have a new float switch, you will need to loosely attach it to the pump housing with a zip tie, and then plug the bypassed electrical wire into it. Fill the pump basin with water, and then adjust the attachment point for the new switch so that it will activate when the pit is at the right water level.
Motor
A sump pump motor is a crucial part of your home’s drainage system. It’s essential to check its operation regularly and ensure that it is in good working order. A simple way to test your sump pump is to pour water into the pit and watch how it reacts. If the float reaches its limit or the motor begins to overheat, it’s time to call a plumber for a repair. A professional can recommend a long-term solution to prevent future flooding.
Sump pumps are often installed in the lowest point of your home, which is usually the basement. However, they can also be located in a cellar or crawl space. In either case, it’s important to keep in mind that the sump pump is constantly exposed to water, which can cause corrosion and other issues.
One common problem with a sump pump is that the motor is too small for the volume of water it must move. A smaller pump will constantly struggle to keep up, leading to a short lifespan for the motor and potentially flooding your basement. To avoid this issue, have a plumber assess the size of your sump pump and install a larger one.
Sump pump repairs can cost a lot of money depending on the type and extent of the damage. Fortunately, there are many factors that can reduce the cost of the job. Regional prices, labor rates, and insurance requirements all affect the final price. You can also save on plumbing costs by getting a home service warranty, which covers labor and parts for the duration of the plan.
A professional plumber will be able to diagnose the exact problem quickly and provide a repair estimate before work begins. They will also be able to recommend the best possible upgrade or replacement for your sump pump if it’s beyond repair. They will take into account your budget and personal preferences when recommending a new installation. The plumber will also help you choose the right type of pump for your home and take care to protect your property during the installation process.
Discharge pipe
The sump pump’s discharge pipe is an essential part of the system. It allows the water from the pit to be pumped away, which is vital because it can help prevent flood damage to the basement and other areas of the home. The discharge pipe should be inspected regularly to make sure it is functioning properly. It may be clogged or blocked, and it may need to be replaced.
A common problem with the discharge pipe is that it gets buried in dirt and debris. If this happens, it can block the pipe completely and cause it to stop working. In addition, the discharge line should be positioned so that it slopes downhill and away from the house. This helps to prevent re-cycling of water, which can lead to overworking the sump pump and causing it to wear out faster than normal.
Contractors will typically install a three or four-inch PVC pipe to the discharge hole on the sump pump. They will also use PVC cement to ensure that the pipe is pointing in the direction of the preferred dumping location. They will then add an air gap to the discharge pipe before it goes underground, which prevents airlocks.
Sump pumps should be tested every few months to make sure they are working properly. This includes checking the float switch and discharge pipe for blockage, leaks, and other issues. It’s also important to test the discharge line outside to make sure that it is extending downhill and away from the house. If it is not, you can add dirt around the foundation or extend the pipe to a new location.
During the test, you should disconnect power from the sump pump and remove the screen at the end of the discharge pipe. You can then rinse off the screen with a hose or wet vacuum to remove any dirt or debris that has built up on it. Once the discharge line is clean, you can reconnect it to the pump and reconnect the power. You should also make sure that the power cord and GFCI outlet are plugged in correctly. You should also wiggle the pipe to ensure that it is tight and hasn’t become loose at a coupling or joint.
Check valve
The check valve is one of the most important parts of a sump pump. It is a one-way valve that prevents water from flowing backward down the discharge pipe. If this did not happen, the sump pump motor would continue to pump out the same water over and over, burning it out.
It is a fairly easy to tell whether the check valve is functioning properly. The check valve is made of clear plastic, so the homeowner can see the action of the gate or flapper. This allows the homeowner to know if the valve is working or not by watching the flow of water down the discharge pipe when the pump shuts off.
Like other valves, the check valve in a sump pump can fail due to age or corrosion. It can also fail if it is located above a high water table or flood zone. If you are using a sump pump in an area of these conditions, it is a good idea to inspect the check valve more often.
In addition to checking for a leak in the body of the valve, you should also inspect the points where the pipes connect to it. In particular, you should check the connection to the discharge pipe for signs of leaking water or sewage. If you suspect that the check valve is leaking, it is a good idea to hire a licensed plumber for inspection and repair.
If you are replacing the check valve, you should first remove all of the water from the discharge pipe. This will make the installation easier and protect your home from flooding. You can use a scrubbing pad, vinegar or a special corrosion cleaner to clean away any pollution that may be clogging the valve. You should also clean off the valve to protect it from future corrosion.
You should then disconnect the new check valve from the discharge pipe. This is usually a quick process, but you should make sure that the new valve is the same length as the old one. You should also carefully check the new valve to ensure that it will fit in your discharge pipe. If the new valve does not fit, it will be necessary to install a larger pipe.